How to use the Banner Uploader?
Overview
The banner uploader is located under the CMS section in the admin. It is called CMS Banner images. Clicking on here will give you a table of the current uploaded banners in use.
The table contains:
- tag - this is the identifier used for positioning the image in the CMS page builder.
- URL - the url where the image will link to.
- Start and End Date - When the uploaded image will be live.
- Image - thumbnail of the uploaded image.
- Buttons - Option to edit or delete the banner
Adding a new banner
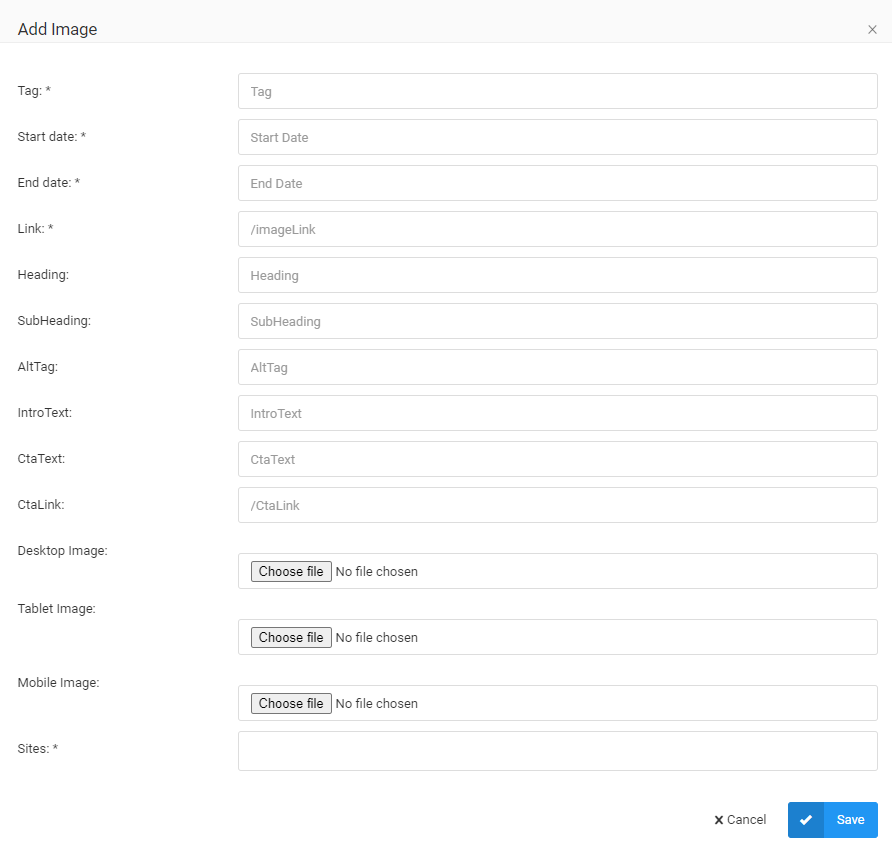
Click Add New Page Image, this pops up this modal:

There are 4 required fields on this form these are:
Tag
This is an id for the placement of the image. For a new image in a new location this should be unique. To add a new image to replace an existing image in the same location, the tag should match the image that you are replacing.
Link
This is the URL that the banner should link to. Onsite links should be added as relative links.
Start and End Date
These are required, when scheduling a new image the start date should match the previous images end date.
Sites
This is required and will be Roman Originals for now but the option will allow you to use the image on multiple sites if required.
The other fields are not required but allow for additional information to be added:
- Heading - Allows heading to be added over the banner
- Subheading - Allows subheading to be added over the banner
- Alt text- Allows alt text to be added to the image
- Intro text - Allows intro text to be added to the image
- CTA text - Allows CTA text to be added to the button to the image
- CTA link - Allows a link to be added to the CTA
The above are all able to be added to the image using the banner uploader but the styling including the position and text colour and button style are all controlled with the CMS pagebuilder. There is then the option to upload 3 images:
- Desktop
- Tablet
- Mobile
To add a line break on a banner using the cms image component add {{\n}} into the title text.
Scheduling a banner change.
When scheduling a change of an image:
- Add a new CMS image.
- Add the same image tag as the image that needs replacing.
- Alter any fields that need changing.
- Set the start date for the new image.
- Edit the exisitng live image so that the end date is when the new image is due to go live.
Best practice when using the CMS image uploader.
- When replacing an image using an image tag, images should be uploaded with the same dimensions so that image fits its intended location
- When scheduling an image that is unlikely to be replaced for a while, set a date a while in the future. There will be a fallback image but if the image doesn't have a known end date, set a distant date it can be changed later
- use descriptive tags, homepage-1 will get confusing quickly
- It is better to add an image and use the CMS pagebuilder to get the text layout correct, then replacement images can have text changes without needing to go into the page builder to alter the position.